[Nginx] 하나의 EC2 안에서 React와 Spring 통신하기
0. 들어가기 전에
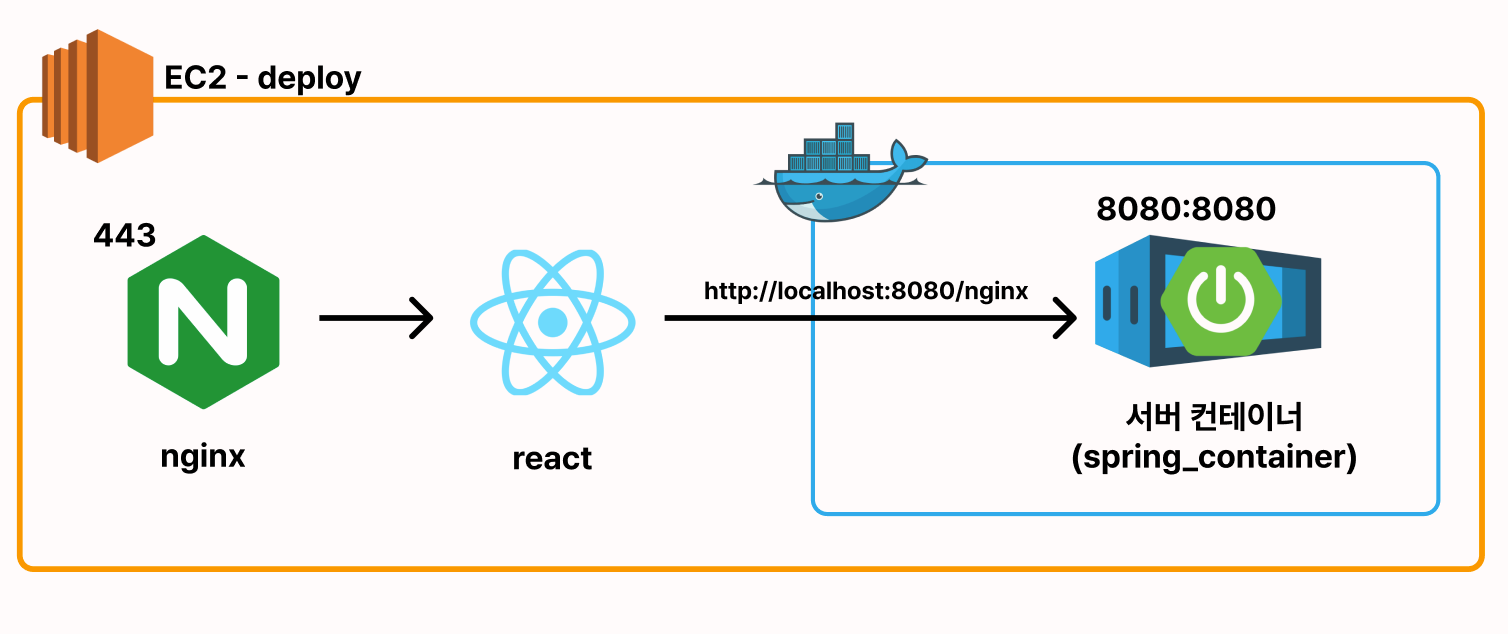
바톤 팀의 배포 EC2는 위 그림과 같았습니다. 한 EC2 안에 react와 spring이 띄워져 있으니 localhost로 API 요청을 보내면 좋겠다고 생각했습니다. 왜냐하면 현재 EC2 인스턴스가 EIP를 받지 않은 상태이기 때문에 불의의 사고로 인해 EC2가 재부팅되면 IP가 변경되기 때문입니다. IP가 변경되면 그에 해당하는 react의 코드를 수정해야 하니 불편한 상황이 생길 것 같았습니다. 그래서 프론트엔드 크루분들께 'localhost로 요청하는 게 좋을 것 같다'고 하며 수정을 요청했습니다. 하지만 실제로 배포된 코드를 살펴보니 문제가 생겼습니다. 이 글은 이때 발생한 문제 상황을 샘플 코드를 만들어, 어떻게 해결하는지 알아보겠습니다.
1. 첫 번째 문제 상황
문제 상황에 들어가기 전에 테스트 서버와 코드가 어떻게 되어있는지 알아보겠습니다.
기본 구조는 처음에 봤던 구조와 같습니다. 코드와 같이 알아보겠습니다.
Nginx
nginx-test.o-r.kr란 도메인을 발급받고 certbot으로 https를 발급 받았습니다.- build된 react 파일을 /home/ubuntu/react에 놓아둔 상태입니다.
server {
    listen [::]:443 ssl ipv6only=on; # managed by Certbot
    listen 443 ssl; # managed by Certbot
    ssl_certificate /etc/letsencrypt/live/nginx-test.o-r.kr/fullchain.pem; # managed by Certbot
    ssl_certificate_key /etc/letsencrypt/live/nginx-test.o-r.kr/privkey.pem; # managed by Certbot
    include /etc/letsencrypt/options-ssl-nginx.conf; # managed by Certbot
    ssl_dhparam /etc/letsencrypt/ssl-dhparams.pem; # managed by Certbot

    root   /home/ubuntu/react;
    index  index.html index.htm;

      server_name nginx-test.o-r.kr;

       location / {
             try_files $uri $uri/ /index.html;
    }
 }

 server {
     if ($host = nginx-test.o-r.kr) {
         return 301 https://$host$request_uri;
     } # managed by Certbot


    listen 80 default_server;
    listen [::]:80 default_server;

    server_name nginx-test.o-r.kr;
     return 404; # managed by Certbot
}React
- GPT가 작성해 준 React 코드입니다.
- 버튼을 누르면 http://localhost:8080/nginx로
GET요청이 가도록 설정되어 있습니다.
import React, { useState } from "react";
import axios from "axios";

const Request = () => {
  const [data, setData] = useState(null);
  const [error, setError] = useState(null);

  const sendRequest = () => {
    setLoading(true);
    axios
      .get("http://localhost:8080/nginx")
      .then((response) => {
        setData(response.data);
      })
      .catch((e) => {
        console.error(e);
        setError(e);
      });
  };

  if (error) return <div>Error occurred: {error.message}</div>;

  return (
    <div>
      <h2>Received Data:</h2>
      {data && <pre>{JSON.stringify(data, null, 2)}</pre>}
      <button onClick={sendRequest}>Send Request</button>
    </div>
  );
};

export default Request;Spring
/nginx에GET요청이 들어오면 success라는 문구를 반환하도록 설정해 두었습니다.- CORS는
http://localhost:8080의 Origin에서만 허용하도록 설정해 놓았습니다.
@RestController
public class NginxController {

    @GetMapping("/nginx")
    public ResponseEntity<String> call() {
        return ResponseEntity.ok("success");
    }
}@Configuration
public class CorsConfig implements WebMvcConfigurer {
@Override
public void addCorsMappings(final CorsRegistry registry) {
registry.addMapping("/**")
.allowedOrigins("http://localhost:8080");
}
}자 이제 요청을 날려보겠습니다.

여기서 Send Request를 누르면

놀랍게도 요청이 보내지지가 않습니다. 왜 그런걸까요? 스프링이 서버에 띄워져 있지 않기 때문일까요?
그렇지 않습니다.
2. 첫번째 문제 해결
이유는 생각보다 간단했었습니다.

이 그림에서 Nginx가 외부의 요청을 받지 않는다고 가정을 한다면 localhost는 우리의 생각대로 ec2 자기 자신을 나타낼 것입니다. 하지만 사용자들은 각자 자신의 컴퓨터에서 ec2로 요청을 보내기 때문에 localhost의 의미가 달라지는 것이죠. 그림으로 나타내면 아래와 같습니다.
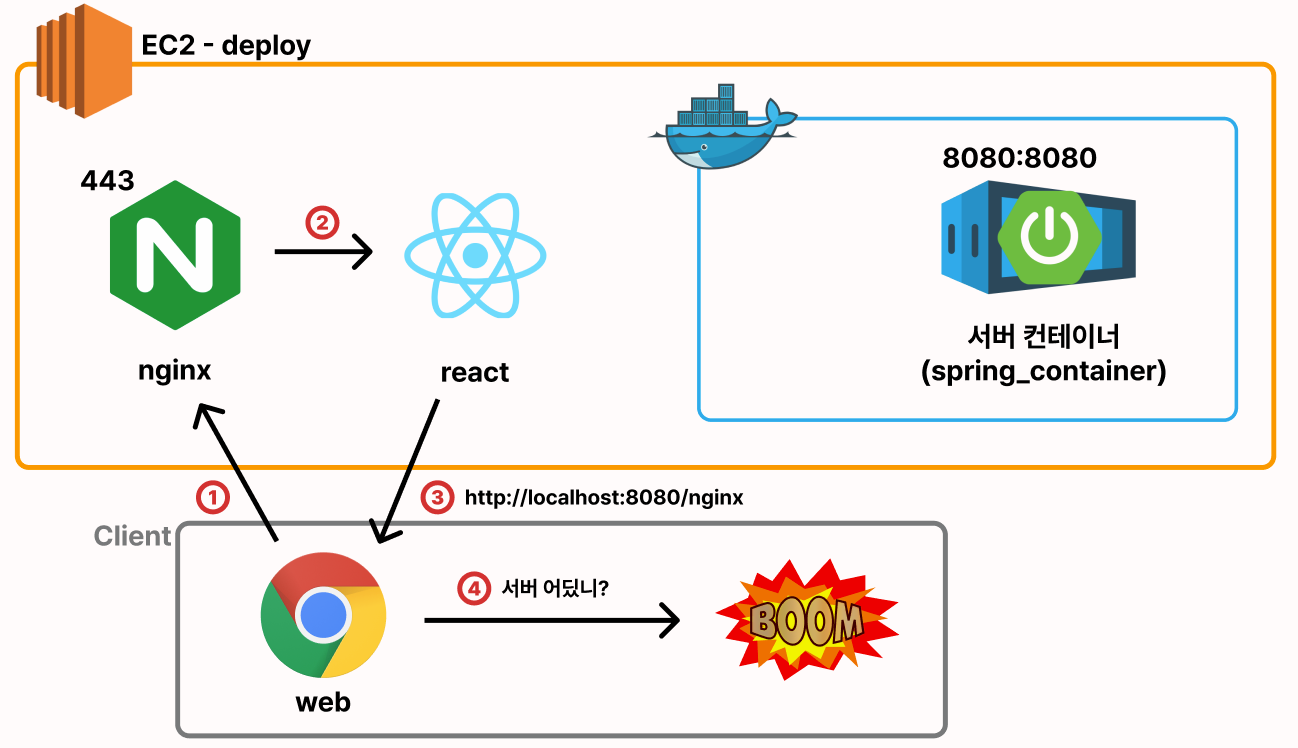
실제로 local에서 ec2에 있는 서버와 동일한 스프링 프로젝트를 실행시키고 있으면 성공하는 모습을 볼 수 있습니다.
그래서 저희는 react에서 API 요청을 보낼 때 localhost로 요청을 보내는 게 아니라 domain을 이용해 요청을 보내는 것으로 수정하고 이에 맞게 CORS도 수정해 줬습니다.
3. 두 번째 문제 상황
import React, { useState } from "react";
import axios from "axios";

const Request = () => {
  const [data, setData] = useState(null);
  const [error, setError] = useState(null);

  const sendRequest = () => {
    setLoading(true);
    axios
      .get("https://nginx-test.o-r.kr:8080/nginx") // 변경된 부분
      .then((response) => {
        setData(response.data);
      })
      .catch((e) => {
        console.error(e);
        setError(e);
      });
  };

  if (error) return <div>Error occurred: {error.message}</div>;

  return (
    <div>
      <h2>Received Data:</h2>
      {data && <pre>{JSON.stringify(data, null, 2)}</pre>}
      <button onClick={sendRequest}>Send Request</button>
    </div>
  );
};

export default Request;위와 같이 React 코드를 변경 후에 요청을 해보았습니다.
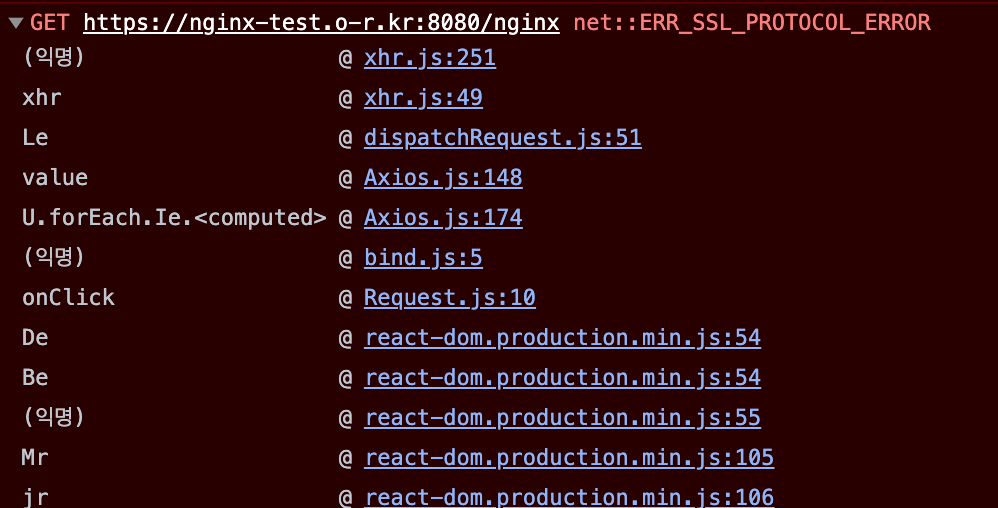
4. 두번째 문제 해결
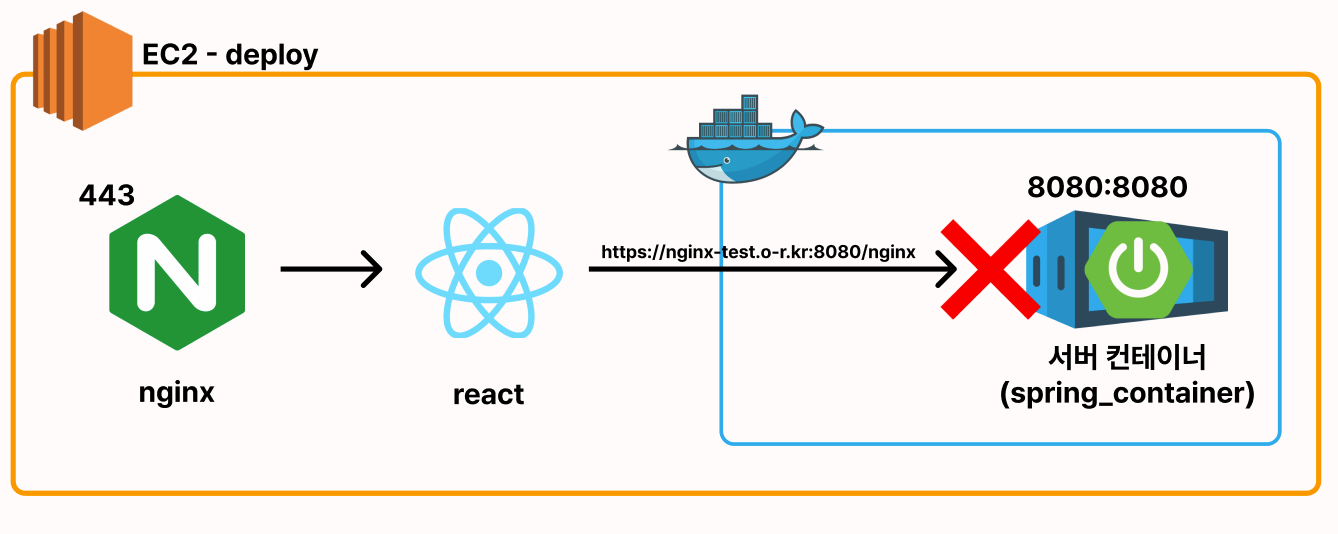
이 에러의 원인을 찾아본 결과 원인은 다음과 같습니다.
바로 스프링이 SSL 통신을 못한다 입니다.
GPT는 다음과 같이 말하고 있습니다.
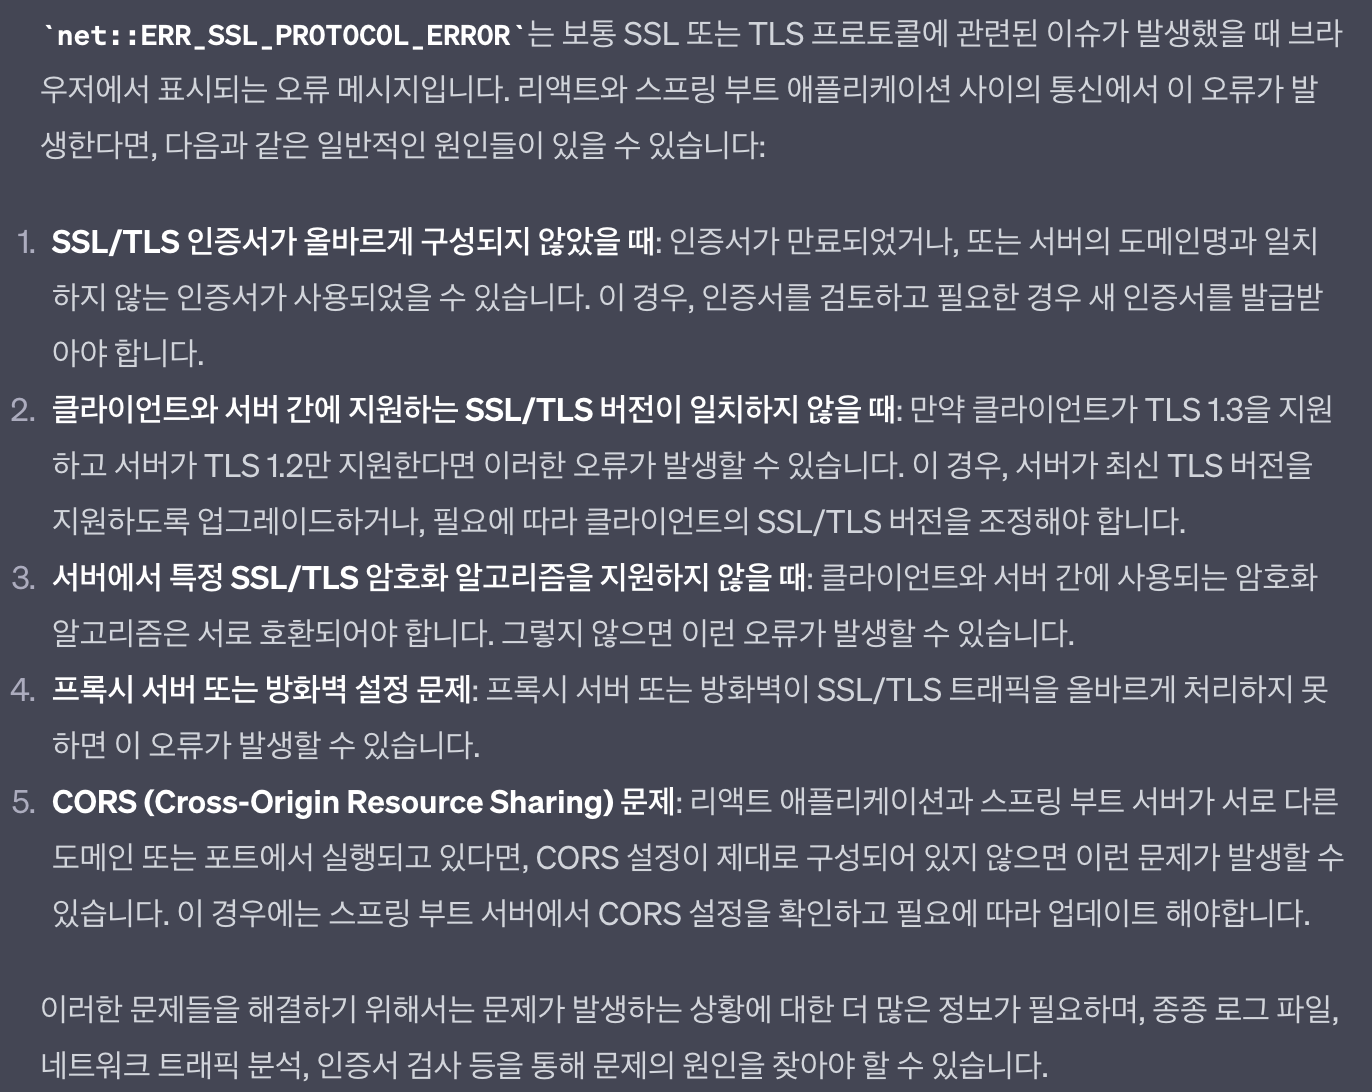
3, 4번을 보면 보안 문제임을 Https 문제임을 알 수 있습니다. 스프링부트는 다른 설정을 하지 않으면 http만 요청만 처리할 수 있기 때문에 https 요청을 처리하지 못하기 때문에 이 오류가 발생한 것을 알 수 있습니다. 그림으로 표현하면 아래와 같은 상황입니다.
그렇다면 이 문제는 어떻게 해결할까요?
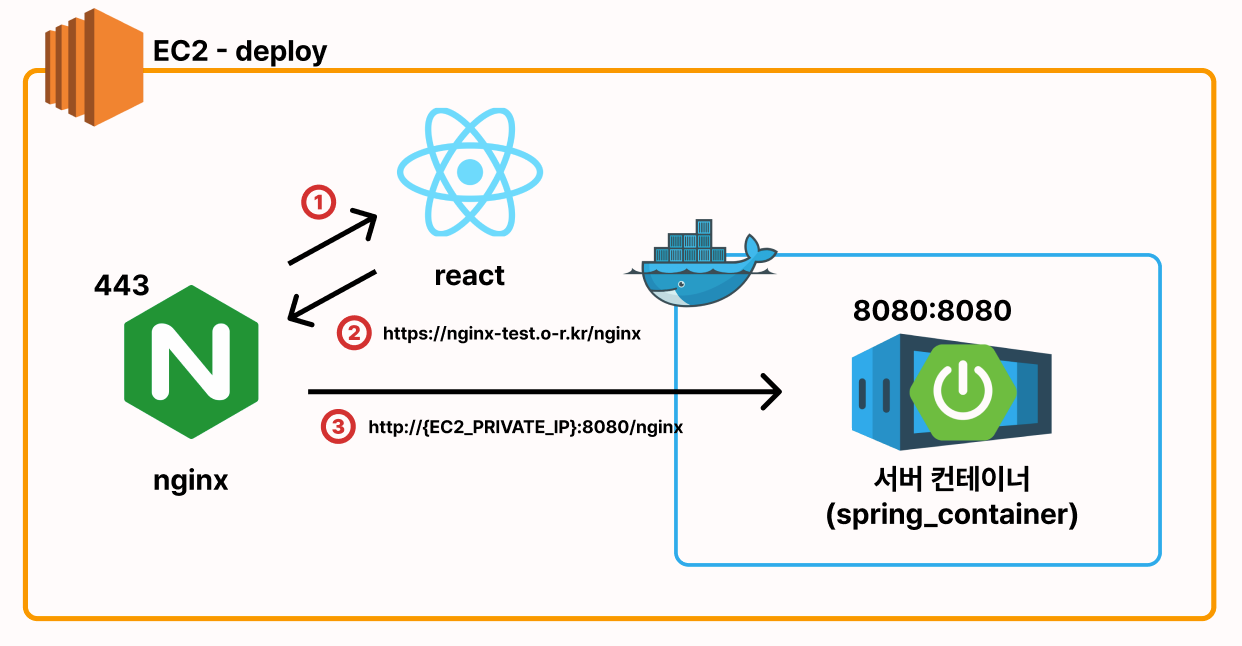
저희는 nginx의 리버스 프록시 기능을 이용해서 처리했습니다.
다음과 같이 서버 블록을 추가했습니다.
location /nginx {
      proxy_pass http://{EC2_PRIVATE_IP}:8080;
      proxy_set_header Host $host;
      proxy_set_header X-Real-IP $remote_addr;
      proxy_set_header X-Forwarded-For $proxy_add_x_forwarded_for;
}
성공적으로 요청이 전송이 되고 최종적인 인프라 구조는 아래와 같이 변경되었습니다.
'개발 > [우테코]' 카테고리의 다른 글
| 바톤의 DB Replication (0) | 2023.10.14 |
|---|---|
| build 할 때 Rest Docs 파일이 생성이 안되는 문제 트러블 슈팅 (0) | 2023.08.20 |
| [Docker] 도커 컨테이너 간 통신 트러블 슈팅 (0) | 2023.07.30 |
| [Docker] 바톤 팀 인프라 구조로 알아보는 도커 (0) | 2023.07.23 |
| 바톤 팀이 Java17를 사용하는 이유 (2) | 2023.07.16 |
[Nginx] 하나의 EC2 안에서 React와 Spring 통신하기
0. 들어가기 전에

바톤 팀의 배포 EC2는 위 그림과 같았습니다. 한 EC2 안에 react와 spring이 띄워져 있으니 localhost로 API 요청을 보내면 좋겠다고 생각했습니다. 왜냐하면 현재 EC2 인스턴스가 EIP를 받지 않은 상태이기 때문에 불의의 사고로 인해 EC2가 재부팅되면 IP가 변경되기 때문입니다. IP가 변경되면 그에 해당하는 react의 코드를 수정해야 하니 불편한 상황이 생길 것 같았습니다. 그래서 프론트엔드 크루분들께 'localhost로 요청하는 게 좋을 것 같다'고 하며 수정을 요청했습니다. 하지만 실제로 배포된 코드를 살펴보니 문제가 생겼습니다. 이 글은 이때 발생한 문제 상황을 샘플 코드를 만들어, 어떻게 해결하는지 알아보겠습니다.
1. 첫 번째 문제 상황
문제 상황에 들어가기 전에 테스트 서버와 코드가 어떻게 되어있는지 알아보겠습니다.
기본 구조는 처음에 봤던 구조와 같습니다. 코드와 같이 알아보겠습니다.
Nginx
nginx-test.o-r.kr란 도메인을 발급받고 certbot으로 https를 발급 받았습니다.- build된 react 파일을 /home/ubuntu/react에 놓아둔 상태입니다.
server {
    listen [::]:443 ssl ipv6only=on; # managed by Certbot
    listen 443 ssl; # managed by Certbot
    ssl_certificate /etc/letsencrypt/live/nginx-test.o-r.kr/fullchain.pem; # managed by Certbot
    ssl_certificate_key /etc/letsencrypt/live/nginx-test.o-r.kr/privkey.pem; # managed by Certbot
    include /etc/letsencrypt/options-ssl-nginx.conf; # managed by Certbot
    ssl_dhparam /etc/letsencrypt/ssl-dhparams.pem; # managed by Certbot

    root   /home/ubuntu/react;
    index  index.html index.htm;

      server_name nginx-test.o-r.kr;

       location / {
             try_files $uri $uri/ /index.html;
    }
 }

 server {
     if ($host = nginx-test.o-r.kr) {
         return 301 https://$host$request_uri;
     } # managed by Certbot


    listen 80 default_server;
    listen [::]:80 default_server;

    server_name nginx-test.o-r.kr;
     return 404; # managed by Certbot
 }
React
- GPT가 작성해 준 React 코드입니다.
- 버튼을 누르면 http://localhost:8080/nginx로
GET요청이 가도록 설정되어 있습니다.
import React, { useState } from "react";
import axios from "axios";

const Request = () => {
  const [data, setData] = useState(null);
  const [error, setError] = useState(null);

  const sendRequest = () => {
    setLoading(true);
    axios
      .get("http://localhost:8080/nginx")
      .then((response) => {
        setData(response.data);
      })
      .catch((e) => {
        console.error(e);
        setError(e);
      });
  };

  if (error) return <div>Error occurred: {error.message}</div>;

  return (
    <div>
      <h2>Received Data:</h2>
      {data && <pre>{JSON.stringify(data, null, 2)}</pre>}
      <button onClick={sendRequest}>Send Request</button>
    </div>
  );
};

export default Request;
Spring
/nginx에GET요청이 들어오면 success라는 문구를 반환하도록 설정해 두었습니다.- CORS는
http://localhost:8080의 Origin에서만 허용하도록 설정해 놓았습니다.
@RestController
public class NginxController {

    @GetMapping("/nginx")
    public ResponseEntity<String> call() {
        return ResponseEntity.ok("success");
    }
}
@Configuration
public class CorsConfig implements WebMvcConfigurer {
@Override
public void addCorsMappings(final CorsRegistry registry) {
registry.addMapping("/**")
.allowedOrigins("http://localhost:8080");
}
}자 이제 요청을 날려보겠습니다.

여기서 Send Request를 누르면

놀랍게도 요청이 보내지지가 않습니다. 왜 그런걸까요? 스프링이 서버에 띄워져 있지 않기 때문일까요?
그렇지 않습니다.
2. 첫번째 문제 해결
이유는 생각보다 간단했었습니다.

이 그림에서 Nginx가 외부의 요청을 받지 않는다고 가정을 한다면 localhost는 우리의 생각대로 ec2 자기 자신을 나타낼 것입니다. 하지만 사용자들은 각자 자신의 컴퓨터에서 ec2로 요청을 보내기 때문에 localhost의 의미가 달라지는 것이죠. 그림으로 나타내면 아래와 같습니다.

실제로 local에서 ec2에 있는 서버와 동일한 스프링 프로젝트를 실행시키고 있으면 성공하는 모습을 볼 수 있습니다.
그래서 저희는 react에서 API 요청을 보낼 때 localhost로 요청을 보내는 게 아니라 domain을 이용해 요청을 보내는 것으로 수정하고 이에 맞게 CORS도 수정해 줬습니다.
3. 두 번째 문제 상황
import React, { useState } from "react";
import axios from "axios";

const Request = () => {
  const [data, setData] = useState(null);
  const [error, setError] = useState(null);

  const sendRequest = () => {
    setLoading(true);
    axios
      .get("https://nginx-test.o-r.kr:8080/nginx") // 변경된 부분
      .then((response) => {
        setData(response.data);
      })
      .catch((e) => {
        console.error(e);
        setError(e);
      });
  };

  if (error) return <div>Error occurred: {error.message}</div>;

  return (
    <div>
      <h2>Received Data:</h2>
      {data && <pre>{JSON.stringify(data, null, 2)}</pre>}
      <button onClick={sendRequest}>Send Request</button>
    </div>
  );
};

export default Request;
위와 같이 React 코드를 변경 후에 요청을 해보았습니다.

4. 두번째 문제 해결
이 에러의 원인을 찾아본 결과 원인은 다음과 같습니다.
바로 스프링이 SSL 통신을 못한다 입니다.
GPT는 다음과 같이 말하고 있습니다.

3, 4번을 보면 보안 문제임을 Https 문제임을 알 수 있습니다. 스프링부트는 다른 설정을 하지 않으면 http만 요청만 처리할 수 있기 때문에 https 요청을 처리하지 못하기 때문에 이 오류가 발생한 것을 알 수 있습니다. 그림으로 표현하면 아래와 같은 상황입니다.

그렇다면 이 문제는 어떻게 해결할까요?
저희는 nginx의 리버스 프록시 기능을 이용해서 처리했습니다.
다음과 같이 서버 블록을 추가했습니다.
location /nginx {
      proxy_pass http://{EC2_PRIVATE_IP}:8080;
      proxy_set_header Host $host;
      proxy_set_header X-Real-IP $remote_addr;
      proxy_set_header X-Forwarded-For $proxy_add_x_forwarded_for;
}
성공적으로 요청이 전송이 되고 최종적인 인프라 구조는 아래와 같이 변경되었습니다.

'개발 > [우테코]' 카테고리의 다른 글
| 바톤의 DB Replication (0) | 2023.10.14 |
|---|---|
| build 할 때 Rest Docs 파일이 생성이 안되는 문제 트러블 슈팅 (0) | 2023.08.20 |
| [Docker] 도커 컨테이너 간 통신 트러블 슈팅 (0) | 2023.07.30 |
| [Docker] 바톤 팀 인프라 구조로 알아보는 도커 (0) | 2023.07.23 |
| 바톤 팀이 Java17를 사용하는 이유 (2) | 2023.07.16 |