[Spring] Spring Rest docs 적용해보기
0. 들어가기 전에
API문서를 Postman으로 만들었었는데, 설정이 바뀔 때마다 업데이트하기가 힘들다는 단점을 느껴서 Restdocs에 대해서 알아봤습니다.
1. Spring REST docs란?
REST API의 명세에 대한 문서화 툴
API 문서화의 대표적 주자는 Swagger와 REST docs가 있습니다. 그 중에서 제가 REST docs를 더 선호하는데 이유는 다음과 같습니다.
- Swagger와 달리 Restdocs는 테스트 코드를 통해 작동하기 떄문에 테스트 코드를 필수적으로 작성해야 합니다.
- Swagger는 운영코드인 Controller 단에서
@Api나@ApiImplicitParams와 같은 어노테이션을 통해 문서화를 해서 운영 코드에 침투적입니다. 반면 REST docs는 테스트코드에서 체이닝 메서드로 작성합니다.
물론 REST docs는 template코드를 직접 작성해야하고, 설정파일이 많다는 단점이 있습니다.
하지만 운영코드에 문서화 코드가 추가적으로 들어가 있어서 보기가 불편하다는 단점이 크기 때문에 REST docs를 선택했습니다.
Rest docs는 RestAssured와 MockMvc 테스트 둘 다 작성이 가능한데, RestAssured 테스트는 그 자체로도 느리기 때문에 추가적인 연산이 들어가면 더 느려져 MockMvc를 선택했습니다.
2. 적용해보기
2.1 build.gradle 설정
plugins {
    id "org.asciidoctor.jvm.convert" version "3.3.2" //.adoc 문서를 해석하기 위한 텍스트 프로세서인 asciidoctor 플러그인 추가
}

configurations {
    asciidoctorExt // asciidoctorExt 종속성 추가
}

dependencies {
    asciidoctorExt 'org.springframework.restdocs:spring-restdocs-asciidoctor' // asciidoctor 의존성 추가
    testImplementation 'org.springframework.restdocs:spring-restdocs-mockmvc' // mockmvc로 REST docs를 사용할 떄 사용
  // testImplementation 'org.springframework.restdocs:spring-restdocs-restassured' // restassured로 REST docs를 사용할 떄 사용
}

ext {
    snippetsDir = file('build/generated-snippets') // 생성되는 스니펫들의 경로
}

test {
    outputs.dir snippetsDir // 위에서 지정한 결로로 스니펫이 생성되도록 지정
}

asciidoctor { // 스니펫들을 불러와 test 테스크 이후에 asciidoctor를 자동 실행하게 함.
    inputs.dir snippetsDir
    configurations 'asciidoctorExt'
    dependsOn test
}
2.2 MockMvc 설정
@WebMvcTest
@AutoConfigureRestDocs
public abstract class DocumentationSteps {

    @Autowired
    protected MockMvc mockMvc;

    @Autowired
    protected ObjectMapper objectMapper;

    protected static RestDocumentationResultHandler document(String path, Snippet... snippets) {
        return MockMvcRestDocumentation.document(path, // 스니펫이 만들어지는 경로를 지정한다.
                preprocessRequest(prettyPrint()), // request의 출력을 예쁘게 만들어준다.
                preprocessResponse(prettyPrint()), // response의 출력을 예쁘게 만들어준다.
                snippets);
    }
}DocumentSteps라는 추상 클래스를 만들고 이 메서드를 상속받는 테스트에서 document() 메서드를 사용해서 스니펫이 만들어지는 경로를 지정한다.
prettyPrint()를 사용하지 않으면 Json 파일이 한 줄로 안나오기 때문에 사용하는 편이 낫다. Snippet들에 추가로 요청 및 응답 파라미터를 지정할 수 있는데 이 방법은 다음 편에서 알아보도록 하겠습니다.
@SuppressWarnings("NonAsciiCharacters")
public class PathControllerTest extends DocumentationSteps {

    @Test
    void 가장_짧은_경로를_찾는다() throws Exception {
        // given
        final Long start = 1L;
        final Long end = 4L;

        final List<Station> stations = List.of(
                new Station(start, "잠실역"),
                new Station(2L, "잠실새내역"),
                new Station(3L, "종합운동장역"),
                new Station(end, "삼성역"));
        final ShortestPath shortestPath = new ShortestPath(stations, Distance.from(25));
        final ShortestPathResponse pathResponse = ShortestPathResponse.from(shortestPath, Fare.from(1250));

        given(pathService.findShortestPath(start, end)).willReturn(pathResponse);

        // when, then
        mockMvc.perform(get("/path")
                        .param("start", String.valueOf(start))
                        .param("end", String.valueOf(end)))
                .andExpect(status().isOk())
                .andExpect(content().json(objectMapper.writeValueAsString(pathResponse)))
                .andDo(document("paths"));
    }
}
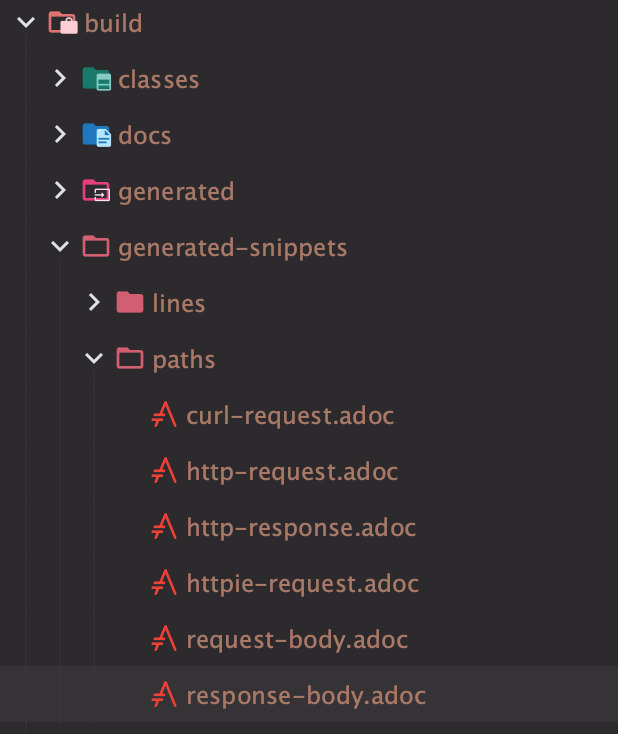
MockMvcTest에서 마지막에 andDo()메서드로 document()를 추가해주고 테스트를 실행하면, build.gradle에서 설정한 snippetsDir경로의 하위에 document에 입력한 path 경로로 스니펫들이 생성이 됩니다.

2.3 adoc 설정
Asciidoctor는 src/docs/asciidoc 경로의 .adoc파일의 정보를 이용해서 html 파일을 만들어주므로, 해당 경로에 adoc 파일을 만들어준다.
= Path API 문서
:doctype: book
:icons: font
:source-highlighter: highlightjs
:toc: left
:toclevels: 3


== 최단 경로 조회

=== Request

include::{snippets}/paths/http-request.adoc[]

=== Response

include::{snippets}/paths/http-response.adoc[]
:doctype: book
:icons: font
:source-highlighter: highlightjs
:toc: left
:toclevels: 3는 해당 파일의 설정을 의미하고
== 최단 경로 조회

=== Request

include::{snippets}/paths/http-request.adoc[]

=== Response

include::{snippets}/paths/http-response.adoc[]에서 =는 markdown의 #과 같다. 또한 include::{snippets}/경로의 스니펫을 가져와 adoc문서를 만듭니다.
이제 gradle에서 asciidoctor를 실행하면 html파일이 build/docs/asciidoc/에 만들어진다.
3. 결과
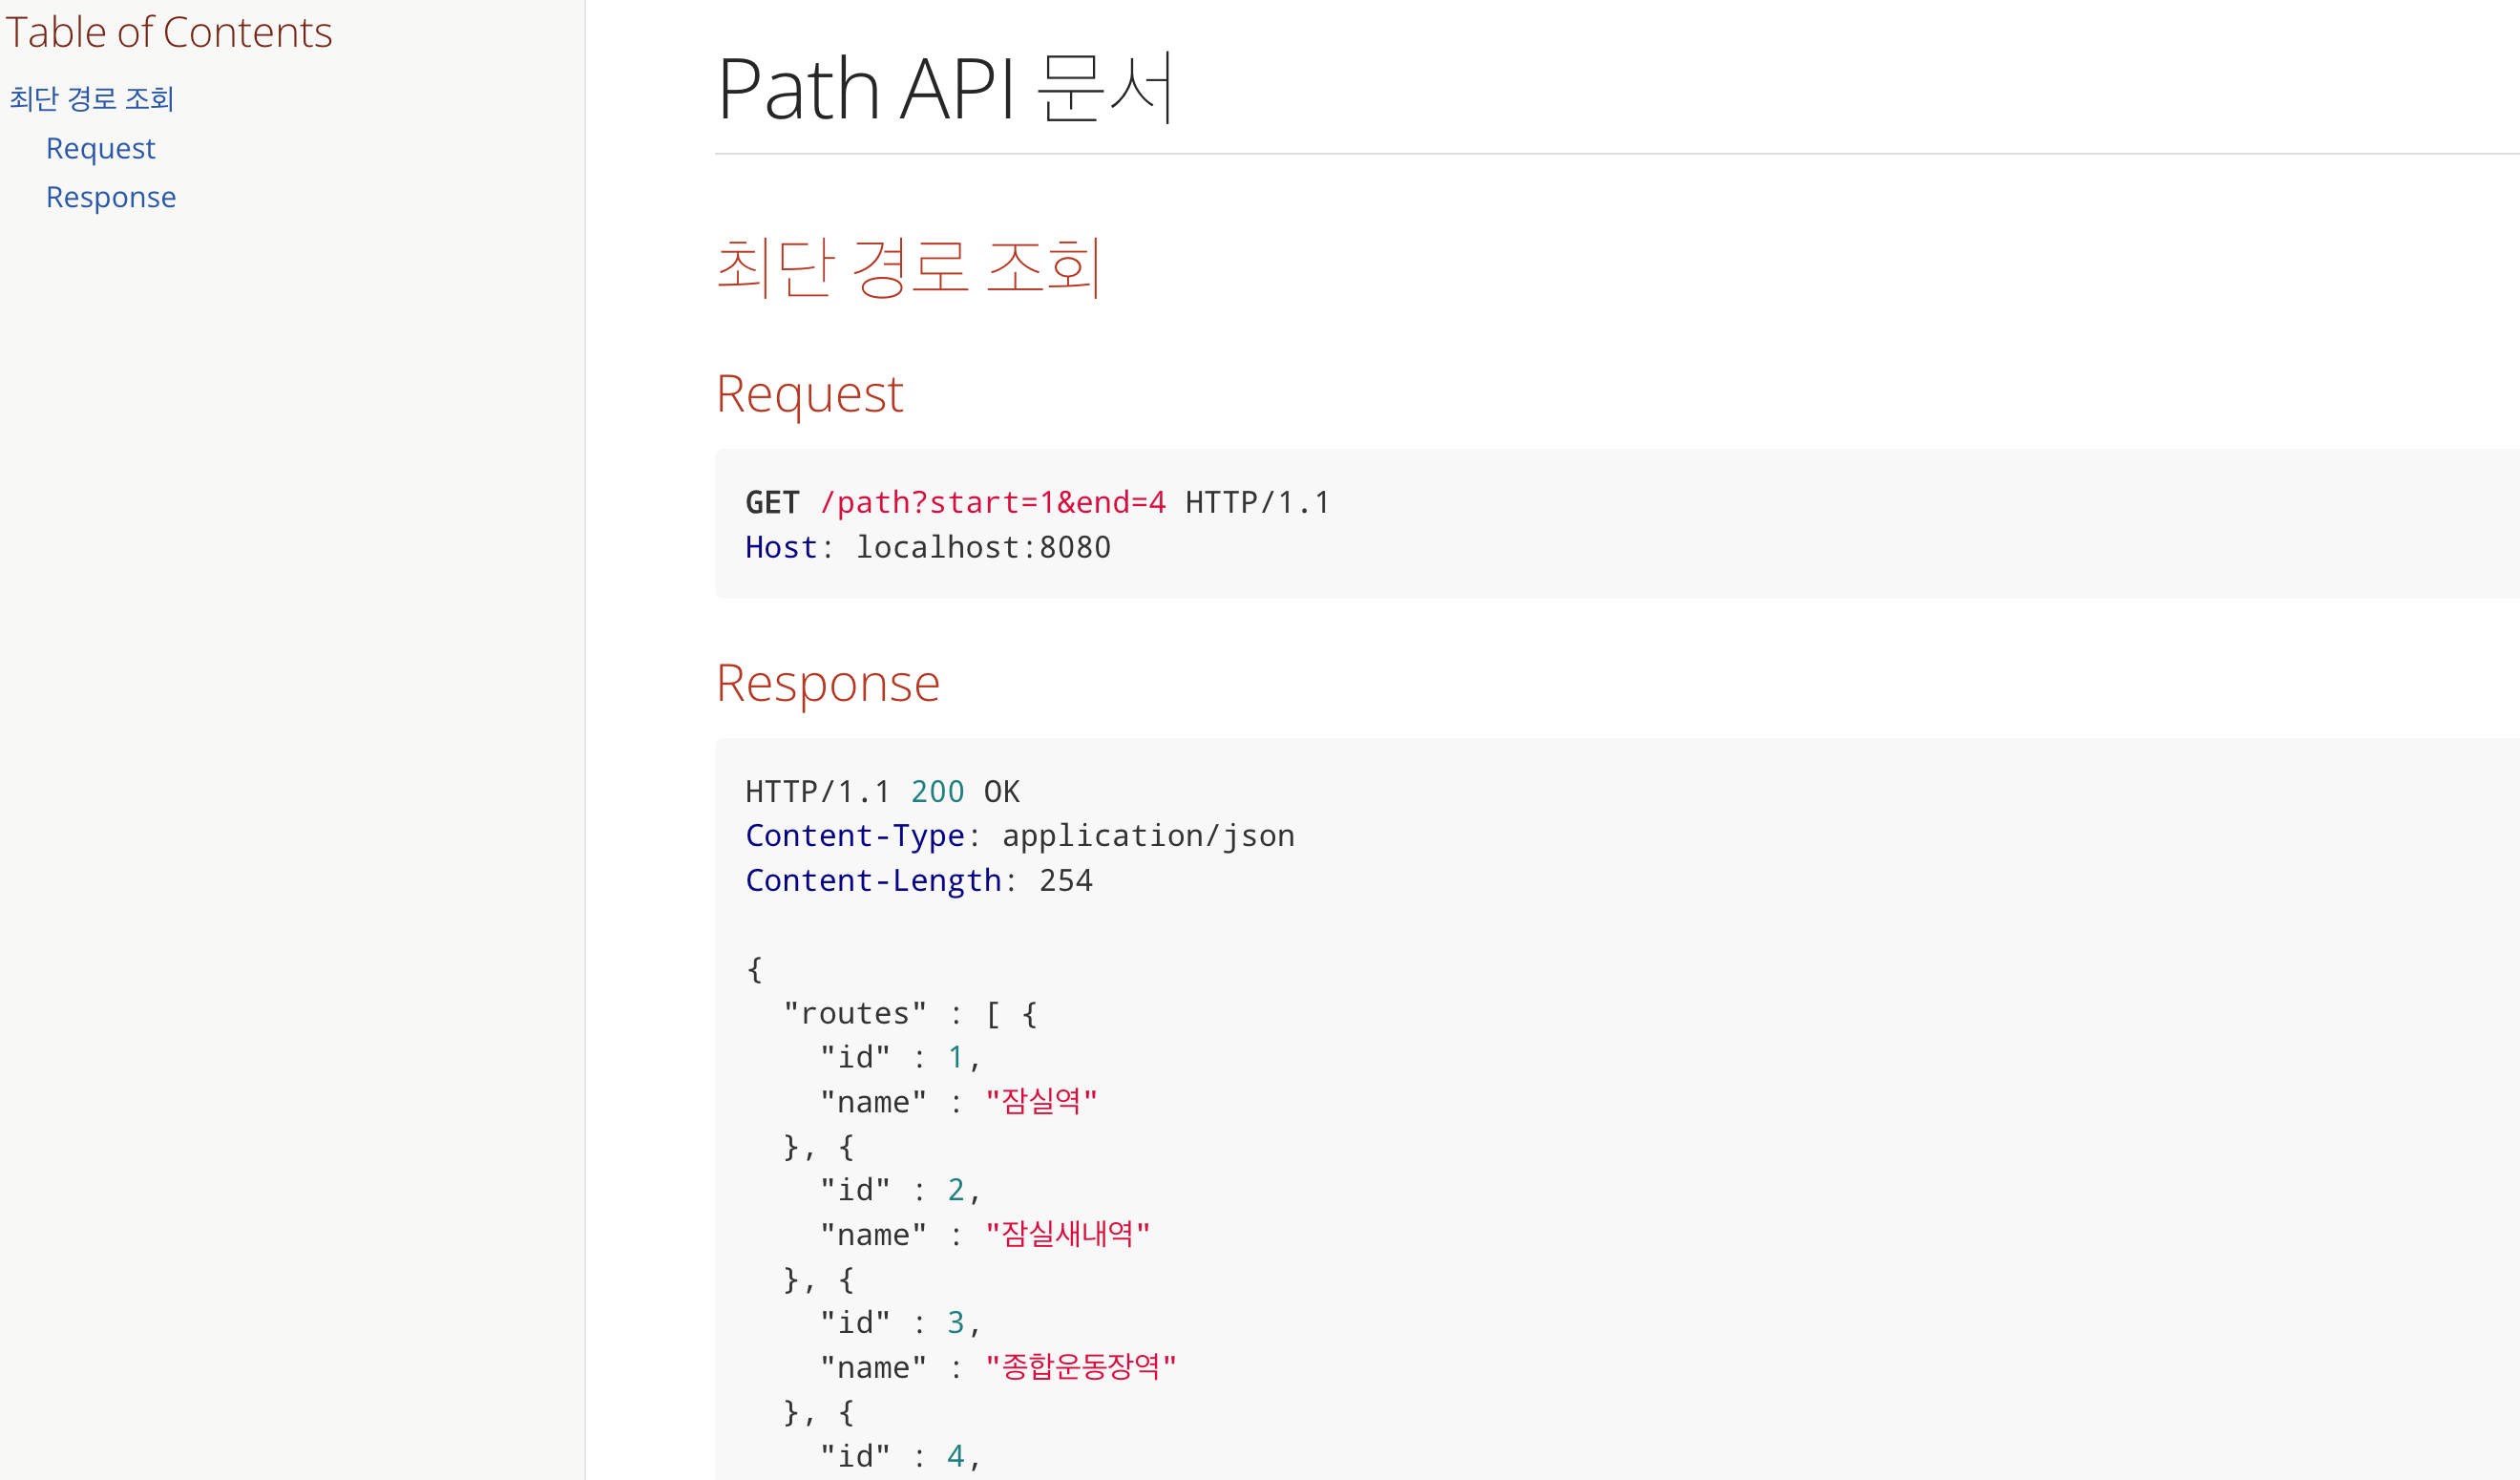
최종적으로 결과는 아래와 같은 html이 만들어진다.

※ 참조
'FRAMEWORK > [SPRING]' 카테고리의 다른 글
| LazyConnectionDataSourceProxy의 역할 (0) | 2024.01.26 |
|---|---|
| [Spring] HandlerMethodArgumentResolver 동작 원리 (0) | 2023.05.07 |
| [Spring] DispatcherServlet이란? (0) | 2023.04.27 |
| [Spring] Spring에서 Bean은 어떤 자료구조로 관리될까요? (0) | 2023.04.22 |
| [Spring] Spring에서 DI하는 3가지 방법 (1) | 2023.04.21 |
[Spring] Spring Rest docs 적용해보기
0. 들어가기 전에
API문서를 Postman으로 만들었었는데, 설정이 바뀔 때마다 업데이트하기가 힘들다는 단점을 느껴서 Restdocs에 대해서 알아봤습니다.
1. Spring REST docs란?
REST API의 명세에 대한 문서화 툴
API 문서화의 대표적 주자는 Swagger와 REST docs가 있습니다. 그 중에서 제가 REST docs를 더 선호하는데 이유는 다음과 같습니다.
- Swagger와 달리 Restdocs는 테스트 코드를 통해 작동하기 떄문에 테스트 코드를 필수적으로 작성해야 합니다.
- Swagger는 운영코드인 Controller 단에서
@Api나@ApiImplicitParams와 같은 어노테이션을 통해 문서화를 해서 운영 코드에 침투적입니다. 반면 REST docs는 테스트코드에서 체이닝 메서드로 작성합니다.
물론 REST docs는 template코드를 직접 작성해야하고, 설정파일이 많다는 단점이 있습니다.
하지만 운영코드에 문서화 코드가 추가적으로 들어가 있어서 보기가 불편하다는 단점이 크기 때문에 REST docs를 선택했습니다.
Rest docs는 RestAssured와 MockMvc 테스트 둘 다 작성이 가능한데, RestAssured 테스트는 그 자체로도 느리기 때문에 추가적인 연산이 들어가면 더 느려져 MockMvc를 선택했습니다.
2. 적용해보기
2.1 build.gradle 설정
plugins {
    id "org.asciidoctor.jvm.convert" version "3.3.2" //.adoc 문서를 해석하기 위한 텍스트 프로세서인 asciidoctor 플러그인 추가
}

configurations {
    asciidoctorExt // asciidoctorExt 종속성 추가
}

dependencies {
    asciidoctorExt 'org.springframework.restdocs:spring-restdocs-asciidoctor' // asciidoctor 의존성 추가
    testImplementation 'org.springframework.restdocs:spring-restdocs-mockmvc' // mockmvc로 REST docs를 사용할 떄 사용
  // testImplementation 'org.springframework.restdocs:spring-restdocs-restassured' // restassured로 REST docs를 사용할 떄 사용
}

ext {
    snippetsDir = file('build/generated-snippets') // 생성되는 스니펫들의 경로
}

test {
    outputs.dir snippetsDir // 위에서 지정한 결로로 스니펫이 생성되도록 지정
}

asciidoctor { // 스니펫들을 불러와 test 테스크 이후에 asciidoctor를 자동 실행하게 함.
    inputs.dir snippetsDir
    configurations 'asciidoctorExt'
    dependsOn test
}
2.2 MockMvc 설정
@WebMvcTest
@AutoConfigureRestDocs
public abstract class DocumentationSteps {

    @Autowired
    protected MockMvc mockMvc;

    @Autowired
    protected ObjectMapper objectMapper;

    protected static RestDocumentationResultHandler document(String path, Snippet... snippets) {
        return MockMvcRestDocumentation.document(path, // 스니펫이 만들어지는 경로를 지정한다.
                preprocessRequest(prettyPrint()), // request의 출력을 예쁘게 만들어준다.
                preprocessResponse(prettyPrint()), // response의 출력을 예쁘게 만들어준다.
                snippets);
    }
}
DocumentSteps라는 추상 클래스를 만들고 이 메서드를 상속받는 테스트에서 document() 메서드를 사용해서 스니펫이 만들어지는 경로를 지정한다.
prettyPrint()를 사용하지 않으면 Json 파일이 한 줄로 안나오기 때문에 사용하는 편이 낫다. Snippet들에 추가로 요청 및 응답 파라미터를 지정할 수 있는데 이 방법은 다음 편에서 알아보도록 하겠습니다.
@SuppressWarnings("NonAsciiCharacters")
public class PathControllerTest extends DocumentationSteps {

    @Test
    void 가장_짧은_경로를_찾는다() throws Exception {
        // given
        final Long start = 1L;
        final Long end = 4L;

        final List<Station> stations = List.of(
                new Station(start, "잠실역"),
                new Station(2L, "잠실새내역"),
                new Station(3L, "종합운동장역"),
                new Station(end, "삼성역"));
        final ShortestPath shortestPath = new ShortestPath(stations, Distance.from(25));
        final ShortestPathResponse pathResponse = ShortestPathResponse.from(shortestPath, Fare.from(1250));

        given(pathService.findShortestPath(start, end)).willReturn(pathResponse);

        // when, then
        mockMvc.perform(get("/path")
                        .param("start", String.valueOf(start))
                        .param("end", String.valueOf(end)))
                .andExpect(status().isOk())
                .andExpect(content().json(objectMapper.writeValueAsString(pathResponse)))
                .andDo(document("paths"));
    }
}
MockMvcTest에서 마지막에 andDo()메서드로 document()를 추가해주고 테스트를 실행하면, build.gradle에서 설정한 snippetsDir경로의 하위에 document에 입력한 path 경로로 스니펫들이 생성이 됩니다.

2.3 adoc 설정
Asciidoctor는 src/docs/asciidoc 경로의 .adoc파일의 정보를 이용해서 html 파일을 만들어주므로, 해당 경로에 adoc 파일을 만들어준다.
= Path API 문서
:doctype: book
:icons: font
:source-highlighter: highlightjs
:toc: left
:toclevels: 3


== 최단 경로 조회

=== Request

include::{snippets}/paths/http-request.adoc[]

=== Response

include::{snippets}/paths/http-response.adoc[]
:doctype: book
:icons: font
:source-highlighter: highlightjs
:toc: left
:toclevels: 3
는 해당 파일의 설정을 의미하고
== 최단 경로 조회

=== Request

include::{snippets}/paths/http-request.adoc[]

=== Response

include::{snippets}/paths/http-response.adoc[]
에서 =는 markdown의 #과 같다. 또한 include::{snippets}/경로의 스니펫을 가져와 adoc문서를 만듭니다.
이제 gradle에서 asciidoctor를 실행하면 html파일이 build/docs/asciidoc/에 만들어진다.
3. 결과
최종적으로 결과는 아래와 같은 html이 만들어진다.

※ 참조
'FRAMEWORK > [SPRING]' 카테고리의 다른 글
| LazyConnectionDataSourceProxy의 역할 (0) | 2024.01.26 |
|---|---|
| [Spring] HandlerMethodArgumentResolver 동작 원리 (0) | 2023.05.07 |
| [Spring] DispatcherServlet이란? (0) | 2023.04.27 |
| [Spring] Spring에서 Bean은 어떤 자료구조로 관리될까요? (0) | 2023.04.22 |
| [Spring] Spring에서 DI하는 3가지 방법 (1) | 2023.04.21 |